Showing posts with label crafting. Show all posts

Tuesday, January 29, 2013

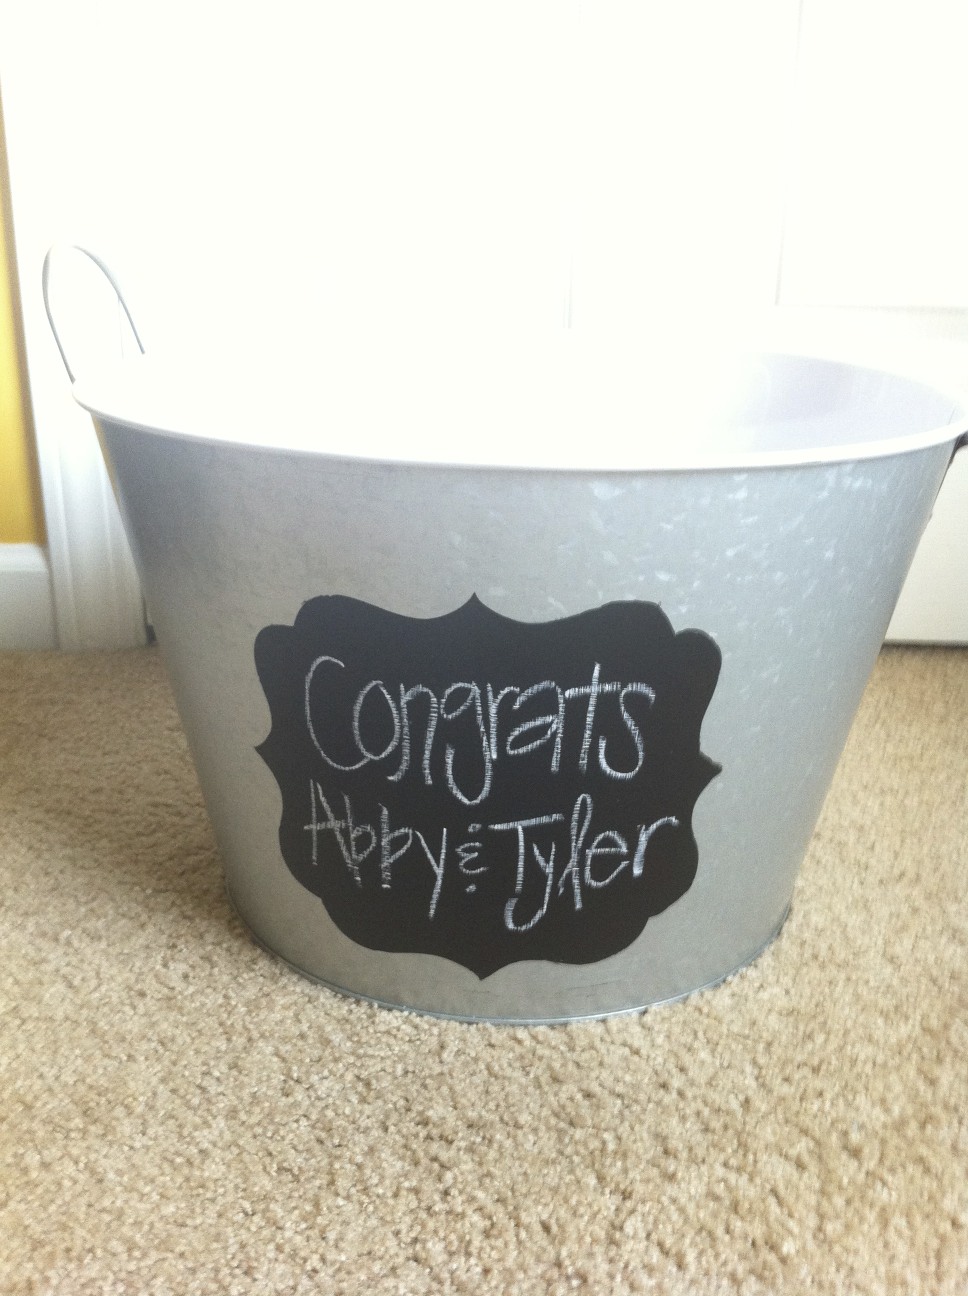
DIY Wedding Gift Tub

First of all I want to apologize for the quality of these pictures… I was too lazy to go get my big camera so I used my iPhone… SORRY! but you get the idea from these pictures….

I bought this beverage tin from Target last summer (shows how long ago I should have done this post) Then used my cricut to cut out this quatrefoil shape out of vinyl to be my stencil. Once the outline of the quatrefoil was attached I simply used chalkboard paint to fill in the empty space. I gave it a few really good coats and let it completely dry before I removed the vinyl. 


Then I filled it with all sorts of goodies the sweet couple register for and TA-DA a cute practical wedding gift they can use to host parties and store things in at home! 

After I made this for my friend, I resisted the urge to go get another tin for myself.  I already have a lime green beverage dispenser… but I loved the simple tin color with the chalkboard! Simple and classic, don't ya think?

Thursday, August 23, 2012

outfit inspiration board


If you've been keeping up with my blog, you know I LOVE to take something I don't like any more and turn it into something fabulous and useful. Thats just what I did with these 2 wall art canvas things I got a long time ago from target. I think I've said this before on here but I'll say it again... I am flat out getting tired of chocolate brown… when we first got married I bought everything dark brown and now I can't stand to look at the color in our house anymore ha. So these canvases caught my eye and they had to be taken down.


So instead of chunking them out, I covered them with some striped fabric I bought at IKEA awhile back. I just used a hot glue gun to secure the fabric to the back of the canvases' frame.


That's it. There's no other steps. Simple as that.


I had these done for a few weeks before I had the idea of what to do with them.

 One day (like most days) I was staring into my closet full of clothes thinking "Gah I have NOTHING to wear!" So being the pinterest fanatic that I am, I headed on over to my"Inspiration for my Closet" board and got some great ideas of what to throw together from the things I already own. Thats when it hit me to print out small pictures of some of my favorite outfit ideas and stick them to my then homeless striped canvases. 


You could also hang it in the kitchen and put up pictures of recipes you want to try soon, or in your craft area with crafts to do… the uses are endless. 

So before you take that not-so-cute-anymore wall art to the goodwill, think about upcyling it to a great new idea board.!

Wednesday, August 15, 2012

DIY Cards


I have really been inspired by Pinterest to do more DIY cards (especially since I pooled my Christmas gift money a couple a years ago to splurge on a cutting machine) With all the great ideas on there, I have been able to use craft supplies, paper, and my printer to make some really cute, personalized cards! Check them out!


Friday, July 20, 2012

FREE super cute invitations


Oh! Aren't these adorable!!!


My sweet and crafty friend made these for one of our friend's house warming party.


I thought they were so awesome I had to share them on here!


She simply stole borrowed a whole lot of paint samples from a home improvement store and just ran them through the printer. 


She practiced on white printer paper until she got the font just how she wanted.


She then held the 3 sheets together with a small brad. What a great idea for inexpensive but super cute invites! 


I love having craft nights with these ladies! I get so many great ideas and get filled up with so much joy and love from my beautiful community! Perfect night!


Thursday, May 3, 2012

SMASH* Journaling


So if you haven't heard of SMASH books yet, here's how I've been describing them… If journaling and scrapbooking had a wonderfully creative baby it would be a SMASH book!

You pretty much pick out a book with a theme that best suits your personality and the things you will be documenting in the book. I choose the eco version. The theme determines what colors/types of paper are in the book. So mine has a lot of earth tones, trees, and flowers.


These pictures are from my friend Emily's SMASH book. She is the fabulous & crafty friend who introduced me to them. They sell all kinds of cute accessories to go with the books like this cute polka-dot tape Emily has. They sell the books and accessories at Michael's and Target! (download the Michael's App and get weekly coupons so you get a steal on your goodies!)


These calendar pockets are super fun! I copied Emily's idea of writing down all the fun events throughout the months. She also had the great idea of printing out her instagram pictures using the contact format in iPhoto. 

These are great for beginners who want to scrapbook but get intimidated by how big of a project they are. But they are equally great for veteran scrapbookers <cough, cough> who may be getting tired of the same ol' thing or don't have time to scrapbook any more. 

I think these are great! check them out and I think you will too!

Wednesday, April 25, 2012

Message Board

So if you haven't picked up on it, I like easy, simple, not-much-time consuming DIY crafts. I'm not into projects that require researching techniques, or studying up on. I'm a pharmacy student, I have enough studying to do :-)


So here's another super easy craft anyone can try. 

1. Go thrifting for old frames. I lucked up and found this unique shaped one that was perfect for the size message board I wanted to create. 

2. Remove backing and glass and spray paint it the color of your choice.

3. Hot glue fabric to the cardboard that comes in the frame.

4. Hot glue twine, ribbon, or string to the back of the cardboard and wrap it around the front. 

5. Then just add small clothes pins to the twine/string/ribbon.

& you've got yourself a cute message board! 


Monday, April 9, 2012

Wine Cork Craft

Ok I promise I am going to lay off on the chalkboard paint soon. In my defense I actually make this along time ago, ok so like in January…. But I just recently finished off the circle of corks. I ran out of wine corks when I made it so Skot and I had to down a few more bottles… haha jk…. The winery at the Biltmore hooked me up with like 100 of them! yay! I can't wait to use them!


So this is one of those cheap charger plates painted with chalkboard paint. …You can find these plates just about anywhere these days. I saw them at Michael's the other day for $2.

Then hot glued corks around it and glued twine to the back.

Simple. Easy. Cute. 

Tuesday, April 3, 2012

Business Card Holder


Ok so maybe I'm a border line hoarder, but I really hate throwing away things that I think could possibly, one day, just maybe be used for something great. I get excited when I find ideas like this on Pinterest, where I can actually put my craziness to use.


So this easy, short little project it pretty self explanatory
1. Clean an empty mint tin
2. Cut out scrapbook paper to fit the top and inside
3. Hot glue paper onto tin


and 5 minutes later you have a cute, easy way to carry your cards around with you… If you don't have business cards of your own, you could always store other peoples you have or those punch cards some businesses offer. Just some ideas as to why you should hoard Altoid tins :-)

Sunday, April 1, 2012

Bathroom Update


This is the end product of a little elbow grease and around $20
Pretty nice hu?


Ok so this not-so-my-style-anymore wall art was on my bathroom walls. The "theme" i guess if it had one was "Persian girly-girl"  … totally just made that name up. Ha


So I ripped off the paper off the back and found this… Then I pried off the staples in the frame and then I was able to take out the glass and pictures. 


I gave them a good coat of white spray paint as a primer. 


Then painted them with this fabulous Martha Stewart paint from Michael's.  I love her paint line, and organizing, and baking…. (seriously when is Martha going to contact me and start paying me for all this advertising) 


Then, I just hot glued fabric onto the original cardboard backing and now I have these beauties! note: I was originally going to put the glass back in too but I managed to not only step on one but both of the pieces. Oh well. It doesn't make that much of a difference.


this is what the jewelry holder started out as. Its cute but as you know I'm kinda obsessed with my chalkboard paint so i decided to paint it the same color as the new wall art and make it into a chalkboard! 


Cute! 


Using the same fabric that I framed, I just sewed a rectangular piece right on to a cheapo Wal-Mart towel and now it looks fancy hu?


Last finishing touch, I went to Lowe's and bought this white shelf and some brackets.  (I always feel like a total idiot in that store, I feel like those old men who work there see me coming and think "Oh Lord, What is she going to try to describe and then make me run all over the store looking for something she doesn't know the name of today.") 

I've been collecting these cute jars from yard sales and thrift stores over the last year. They're perfect for storing bathroom essentials. I also wanted to sit out my fastly growing essie nail polish collection. I love painting my finger and toenails, now I can easily pick out what color I'm in the mood for without digging under the counter. 1st world problem I know….. 

I hope that I have inspired you to use what you already have in your house and update it to fit your new style! It's a very green way to decorate and cheap :-)

Saturday, March 24, 2012

Onesie Tutorial

I have a handful of sweet friends who are either pregnant or have babies right now so these were are great craft to learn to do.  They were super easy! A sewing machine is optional too, so this would be a fabulous project if you're wanting to do a fabric-clothing-type craft but  don't have one yet!


So here's what you need….


1. Iron on adhesive. This is what mine looked like from Hancock but they sale a different brand at Wal-Mart. 


2. Onesies … got these from TjMaxx
3. Fabric… I used seersucker pink :-) It doesn't take much. If you don't have scraps laying around, I would buy about 1/4 yard for 5 onesies.


1st: Iron the adhesive side to the BACK of your fabric


2nd: Make some templates… I used my cricut to make mine. You could also print images and just cut them out.


3rd:  Trace your image onto the paper side of your adhesive paper (note: if you're doing letters remember to trace and cut them out flip-flopped.

4th: Cut them out

5th: I didn't take a picture but you have to peel off the adhesive paper from your fabric . Then the back of your fabric will have the adhesive on it.


6th: Iron your fabric with sticky side down on the onesie


7th: To finish it off you have to sew around the fabric so that it won't come off in the washer. You can do this by hand with just a needle and thread, or use a sewing machine. 


and there you have it! Cute, personalized outfits for the sweet babies in your life! 

Saturday, March 17, 2012

Chalkboard Paint : The Possibilities are Endless


My husband didn't bring much into our marriage furniture and appliance wise, but he did bring a washer and dryer that he shared with 5 guys in college.  They work great and I'm thankful we didn't have to make that big purchase right when we got married but they weren't the prettiest appliances. They had quite a few dings and scratches on the top… so what did I do… I turned them into chalkboards! 


I just taped off all the white areas and nobs around what I wanted to paint and went to town. I used the spray paint chalkboard paint 1st but it didn't work to well. So 10,000 brain cells later I decided that spray painting in a tiny room probably wasn't the best idea to begin with and I just used regular chalk board paint. The same kind I used for this project


I think it spruced up our old appliances quite nicely! A pretty laundry room is always nicer to do chores in don't you think?


Related Posts Plugin for WordPress, Blogger...